by Lance Hill | Sep 11, 2025 | How To, Mirliton

We have a problem.
The 2023 heat dome killed almost every mirliton vine in Louisiana. Then the 2024 heat waves nearly wiped out most first-year vines. How does heat stress cause mirlitons to fail, and what can we do about it?
What is Heat stress?
The term “heat stress” refers to a period in which plants are subjected to high temperatures for long enough to permanently alter their ability to function or grow normally. Heat stress is the cumulative effect of the heat’s severity, the time the plant is exposed to the heat, and the rate at which the temperature is rising.
What is a Heat Wave?
It depends on where you are. Obviously, a warm day in Louisiana might be a blistering heatwave in Vermont. Generally, botanists define a heat wave as any period when temperatures exceed 90℉ for 7-10 days. That’s a national average, of course. Along the Gulf Coast, we can reasonably say that several consecutive days exceeding 93° will stress a mirliton vine and require protective measures.
High temperatures and high heat index are not the same thing. The heat index combines temperature and humidity–but plants can’t feel humidity, nor does it affect them. They only feel the temperature of the surrounding atmosphere. If you place a thermometer next to a leaf, it will tell you precisely the heat that the plant is experiencing.
For our purposes, only the ambient temperature measured with a thermometer determines whether a heat wave is present.
Heat Stress and the Mirliton Canopy
Solar radiation is both life-giving and life-taking for a plant. It’s what fuels photosynthesis that enables plant growth, but it can also damage a plant and cause plant failure.
Solar radiation is the source of all heat stress. It is comprised of infrared rays (IR), which heat up plants when they strike the leaves, and ultraviolet-b (UVB), which regulates plant growth and development. While they both are essential to plant life, excessive IR and UVB can damage a mirliton and cause plant failure.
We tend to think that a heatwave simply dehydrates a plant–like it does humans. It’s not that simple; excessive heat from the sun sets off a cascade of problems. It does this in three ways.
First, excessive UVB can literally kill the plant’s chloroplasts in the leaves. Chloroplasts are essential in the photosynthesis process of turning sunlight into sugars to nourish plant life. Without chloroplasts, the plant is starved of a fundamental nutrient. Interestingly, the main reason imported chayote don’t grow well in the U.S.A. is that they are grown at high altitudes on cloud-covered mountains in Mexico and Central America. The clouds filter out significant UVB. Take the same variety and plant it in the U.S.A., and it will get a full dose of UVB and die.
Second, excessive solar radiation can overheat a plant and induce a type of heat stroke. Stomata are tiny pores on leaves that guard plants against excessive heat by regulating leaf temperature with evaporative cooling. When temperatures rise, stomata open wider, releasing water vapor into the atmosphere. This process, called transpiration in plants, cools the plant and leaf surface, similar to how sweating cools the human body. But too much heat causes the stomata to close, and the plant loses its ability to cool itself. The plant overheats and dies from excessive heat.
Third, when the stomata in the leaves are open, they facilitate a flow of dissolved nutrients from the soil upward to the leaves, thereby nourishing the entire plant. The stomata accomplish this by releasing water vapor from the leaves, which creates a negative pressure, or “pull,” that draws water up from the roots through the plant’s xylem via the transpiration process. This transpiration-driven water movement creates a continuous column of water from the soil, up the roots, and out into the atmosphere.
The open stomata are key to pulling a continuous column of water from the soil, up the roots, and out into the atmosphere. But, too much heat and the plant closes the stomata, which then prevents the plant from not only regulating leaf temperature and taking in CO2 for photosynthesis. Plant temperature soars, nutrients cease to flow, and the plant fails. That means that during a heat wave, no matter how much you water your mirliton vine, the heat may close the stomata, the plant’s temperature will rise, and the plant will fail.
Heat stress also affects the plant’s metabolic processes, causing oxidative stress, which harms cells and impairs growth; gibberellic acids and other phytohormones go awry, causing buds, blossoms, and fruit to drop off.
Bottom line: Heat stress can simultaneously overheat, starve, and trigger a cascade of events that can kill your mirliton vine.
How Can We Protect the Canopy?
We’ve already found the solution: shade cloths. We are fortunate that most mirliton growers use small trellises that can easily and affordably be covered with a 40% shade cloth. Those will filter out substantial UVB, which will protect the chloroplasts, and the infrared rays that will cool the plant. (Don’t use denser shade cloths, as the vine does need solar radiation to grow, and UVB is a natural fungicide.)
Growers who have trellis structures for shade cloths don’t have to worry about heat waves.
Moreover, a shade cloth structure can also serve as protection from excessive rain. That’s particularly important following the 2025 monsoon rains that waterlogged and killed most first-year vines. Your shade cloth frame can double as a “rain-guard” when needed. You can simply drape a sheet of 6-mil plastic over the shade frame of cloth to shunt the rain off to the sides of the bed like an umbrella.
Come hell or high water, you’ll be covered.
by Lance Hill | Aug 18, 2025 | How To, Mirliton
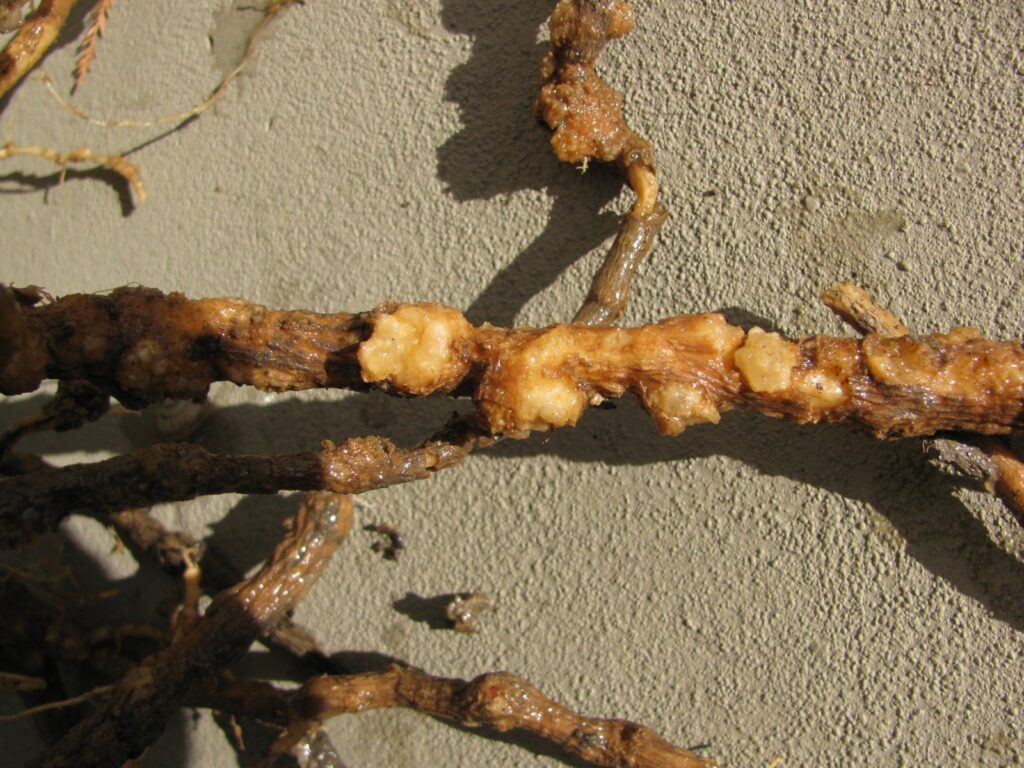
Root-Knot Nematodes Galls on Parasitized roots.
If your mirliton vine begins to come back each year with less vigorous growth and fruit yield, root-knot nematodes (RKN) may explain the cause. They are especially a problem with older vines in sandy soil. In Mexico and Central America, RKN are such a pest that the large commercial chayote farms pull up all their plants every three years and replace them with new ones.
RKN can infest the roots of mirliton within three years, though we don’t normally see that problem in the Gulf Coast south. Nematodes are deceptive and hard to diagnose without digging up the roots and inspecting them for galls. RKN don’t suddenly kill mirlitons vines; instead, they gradually drain them of nutrients so that the most frequent symptom is little growth and low fruit yield.
When the vine begins to exhibit this slow decline, most growers often think it is due to a lack of fertilizer and try to solve the problem by piling on more fertilizer.
But the solution is simple. You can buy beneficial nematodes that kill the root-knot ones. You add the beneficial nematodes to a gallon of water and drench the soil in the early spring and late fall. That will wipe out the root-knot nematodes almost immediately, and will continue to contriol them if treated every three years.
You can buy them here.
View photos of the excavated roots here.
by Lance Hill | Jul 1, 2025 | How To, Mirliton
Alternaria Leaf Spot and Alternaria Leaf Blight are two related plant diseases that affect mirlitons (chayote). The fungus Alternaria cucumerina causes leaf blight, and the fungus Alternaria alternata f. sp. cucurbitae causes leaf spot.
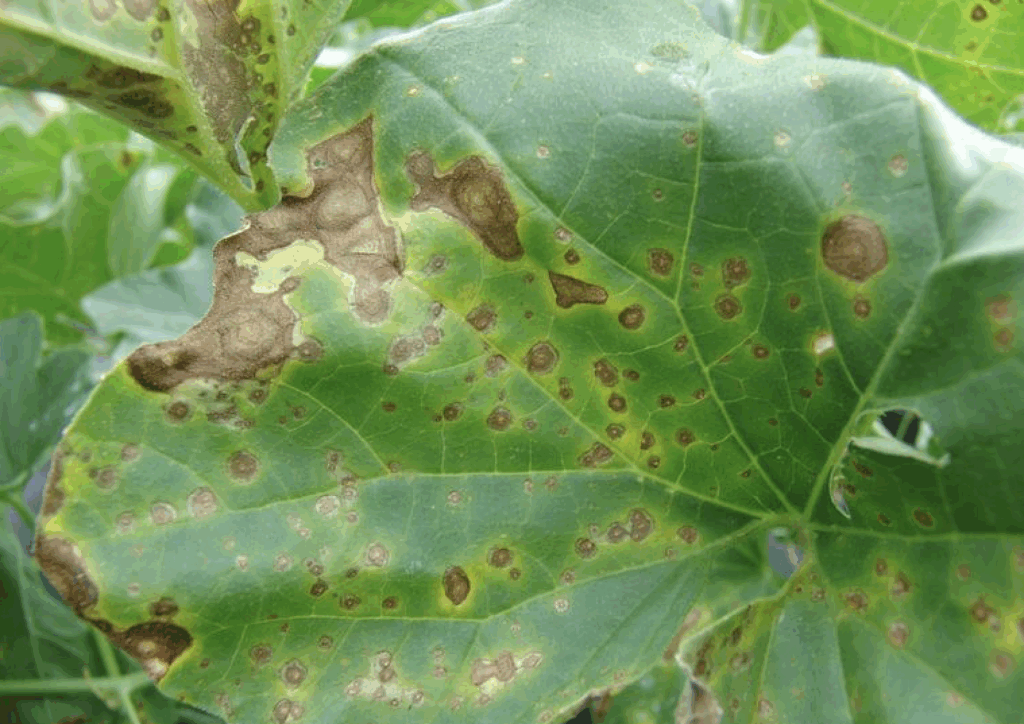
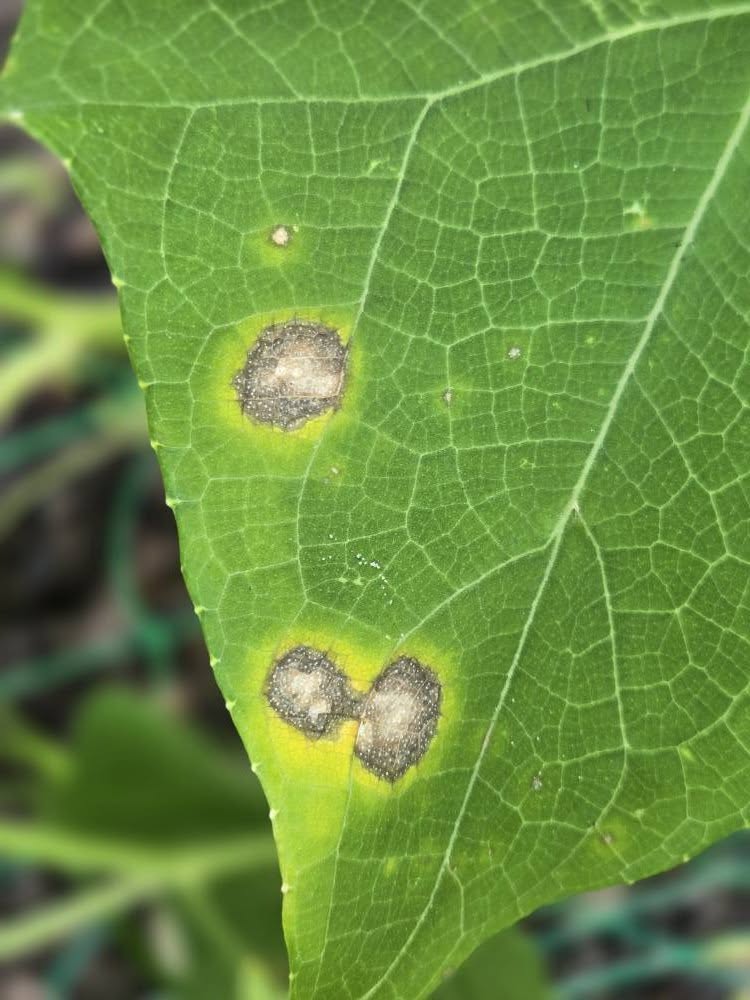
Alternaria leaf spot.
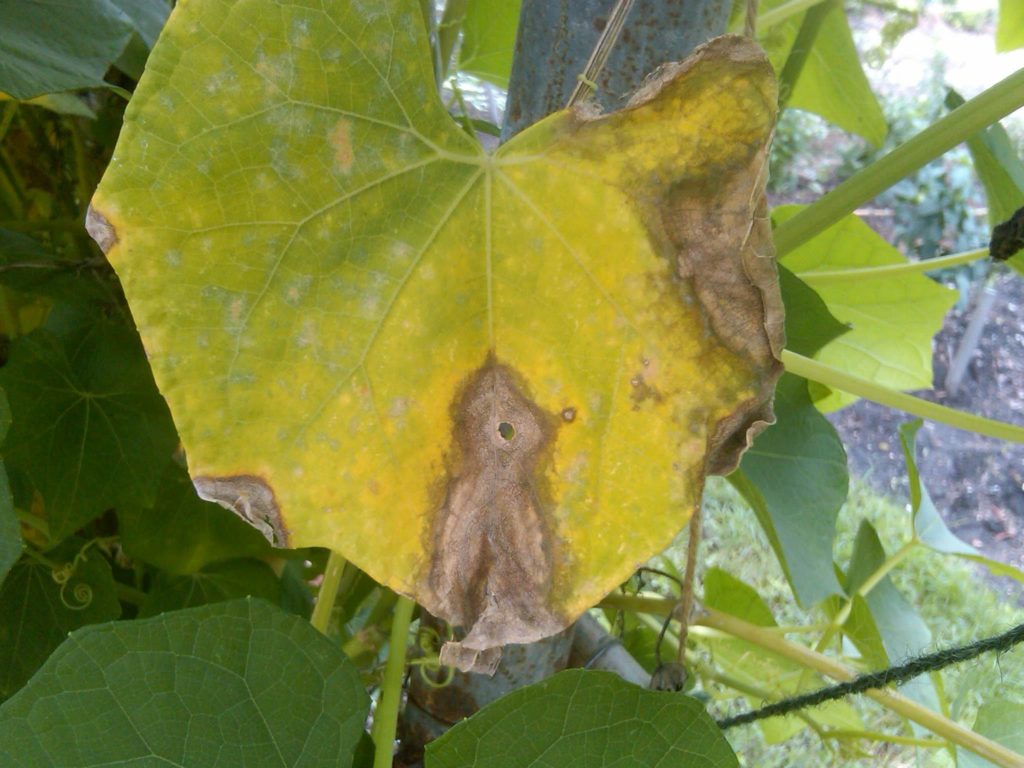
The disease first appears as brown leaf spots with a yellow halo, and as the spots coalesce, they can turn the entire leaf brown (necrotic) and cause it to die. At that stage, it’s referred to as “leaf blight.
Leaf spot starts with concentric black rings that often have a yellow (chlorotic) halo around margins. Although the disease primarily affects leaves, it also causes brown lesions on the stems. Unlike anthracnose, alternaria does not penetrate the stems and block the flow of nutrients and moisture, so it won’t kill entire shoots and stems as does anthracnose. The vine will lose leaves, but usually survives the disease and produces in the fall.
There is no known fungicide that can be used to treat it if the temperatures exceed 88℉. Copper-based fungicides do prevent and eradicate the fungus, but they are phytotoxic in hot weather and can kill the plant. There are products like Daconil that coat the plant with a film, making it difficult for the fungus to establish itself on the vine. However, it must be applied from spring forward, and there’s no scientific study that indicates it’s effective as a preventative on mirlitons. Mirltion.Org is currently experimenting with a new biofungicide to test its effectiveness.
Treatment:
Do not water the vine from the top down–that will only spread the disease, as it also does with anthracnose. Remove all the dead leaves.
Because the disease primarily affects the leaves, the vine will continue to replace dead leaves with new ones. As a result, the vine will normally survive the summer and produce a crop in the fall.
Here is a link to several images of the disease on different crops.
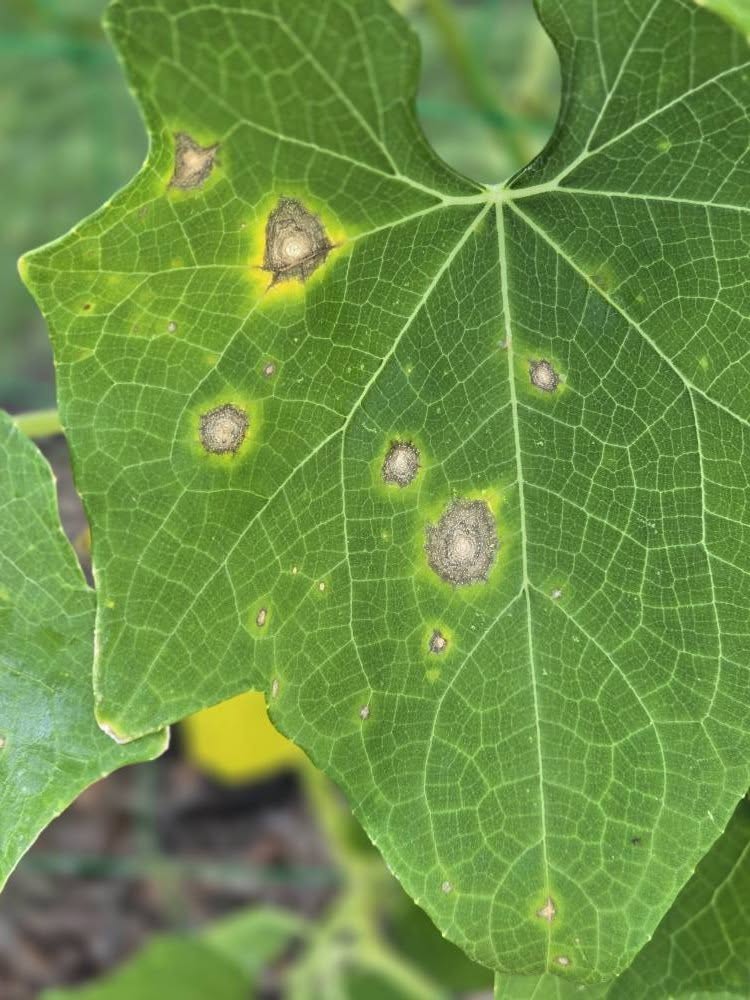
Alternaria Leaf Spot. Early stage.
Advanced alternaria leaf blight. Soon, the entire leaf will become brown.
by Lance Hill | Jun 28, 2025 | How To, Mirliton
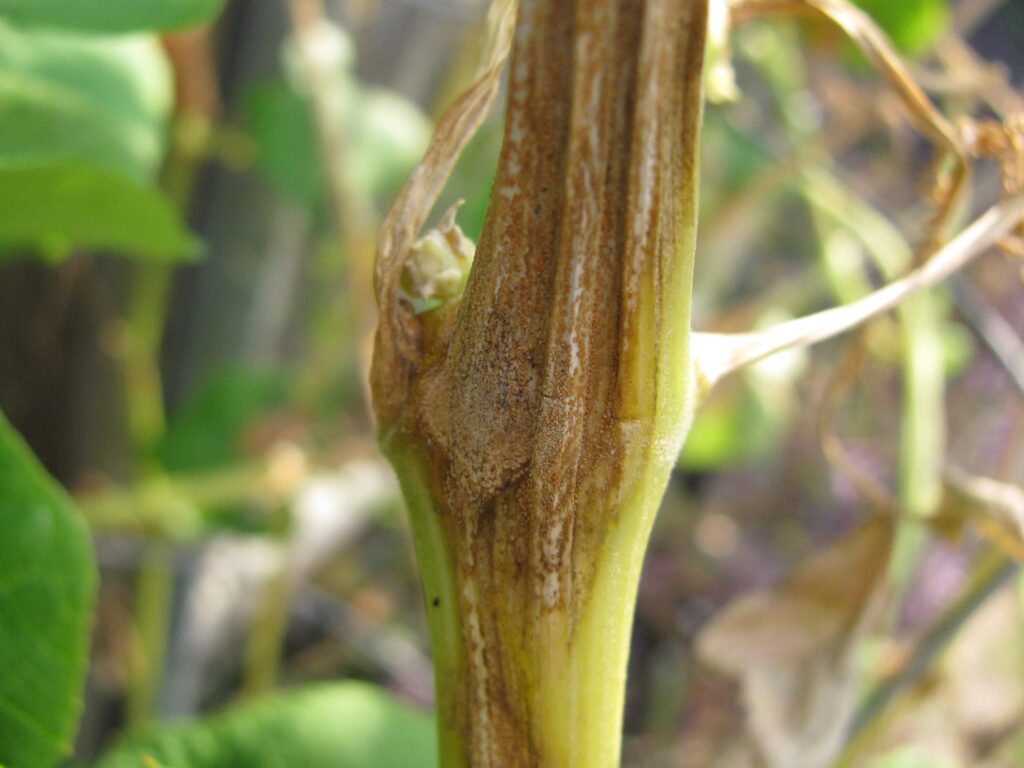
Lesion with salmon-colored fruiting bodies (acervuli)
Tim Dill recently posted a photo of his mirliton vine that looked like it was on its last leg. Many people weighed in on what they thought the problem was: squash vine borers, insufficient fertilizer, drainage, and plant disease. However, the long view of his vine did not provide enough information to diagnose the problem, so we requested close-ups of the vine, and Tim delivered.
The photo clearly shows the early stages of anthracnose. This is what is known as a lesion, and the black spots are referred to as “fruiting bodies” (acervuli), which contain spores that spread the disease. The fruiting bodies start as salmon-colored dots and then turn black as the disease progresses. Additionally, small gummy drops of exudate will eventually appear, and the stem will split open. The leaves will have yellow wedges, and in the final stages, they will develop “rifle shot holes” in the brown, dead tissue. That’s because the fungal pathogen that causes anthracnose is necrotrophic, meaning that after it kills the plant cells, it can feed on dead tissue as well.
Tim’s problem was not caused by too much or too little water, too much sun, or insufficient fertilizer. And all the remedies for those causes would not have helped and probably would have done more harm.
So the first question we should always ask is for good close-up photos of the leaves and stems. Most smartphones can take a photo that can be magnified if needed. Videos are better than nothing, but only photos permit a close examination of the leaf and stem symptoms.
You can learn how to diagnose anthracnose for yourself and others by viewing this photo album of anthracnose signs (click on the first photo in the series to enlarge the images).
https://www.mirliton.org/photo/anthracnose-damage-to-mirliton-plant-parts/
We used to never see anthracnose this early in the season. However, the periodic rains and warm nights create a perfect storm for the fungus; it thrives in the nighttime heat, and then rainfall ruptures the fruiting body, splashing the spores throughout the plant during the day (or top-down watering).
There’s no cure for anthracnose once it takes hold. Daconil is often prescribed for anthracnose, but it is not a fungicide and can’t kill the fungus that causes anthracnose; it simply coats the plant with a film that makes it more difficult for the fungus to attach to the stem and leaves. It’s a preventative, not an eradicant, and would have to be applied from the time the vine was planted and throughout the season.
We are testing a new biofungicide, Timorex Act, and will report on our findings when the trials are complete.
The good news is that normally, the vine will recover from an attack and produce in the fall–and will have acquired natural resistance to the disease.
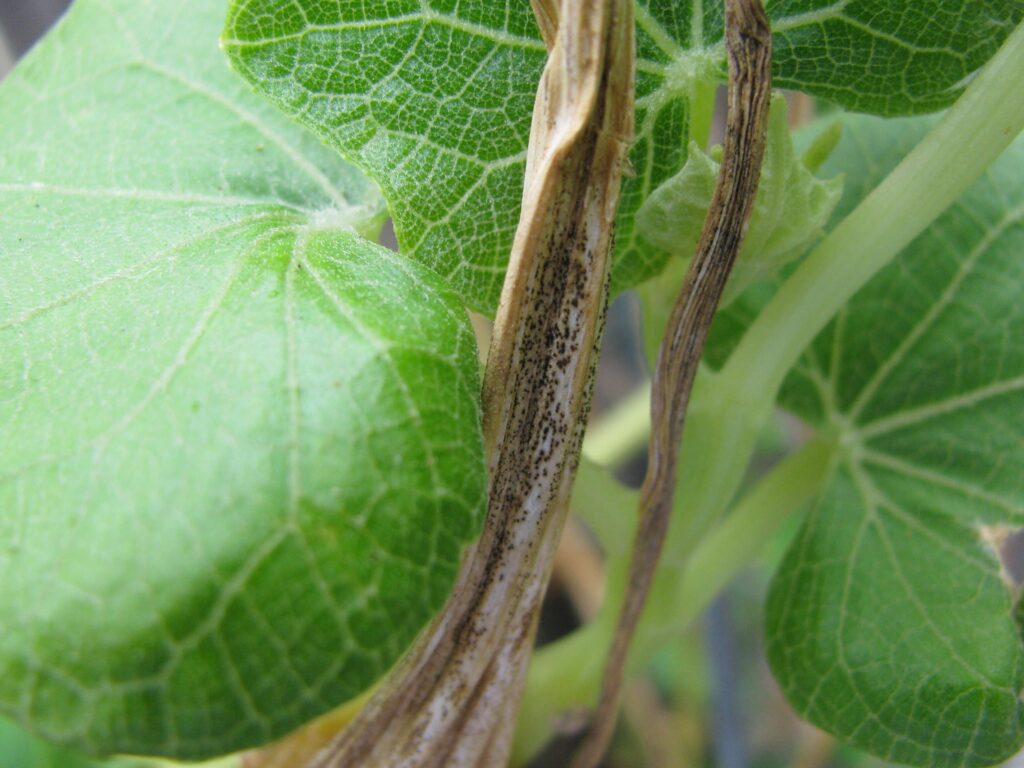
Advanced lesion with black fruting bodies (acervuli)
Lesion with salmon-colored fruiting bodies (acervuli)
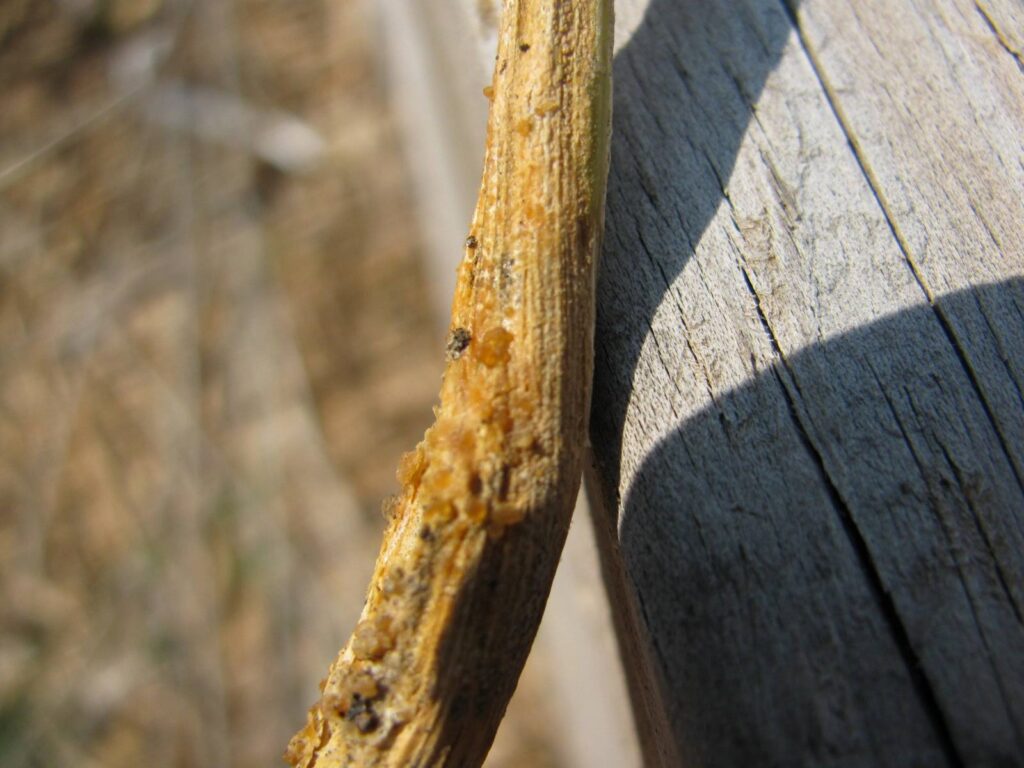
Gummy edudate.
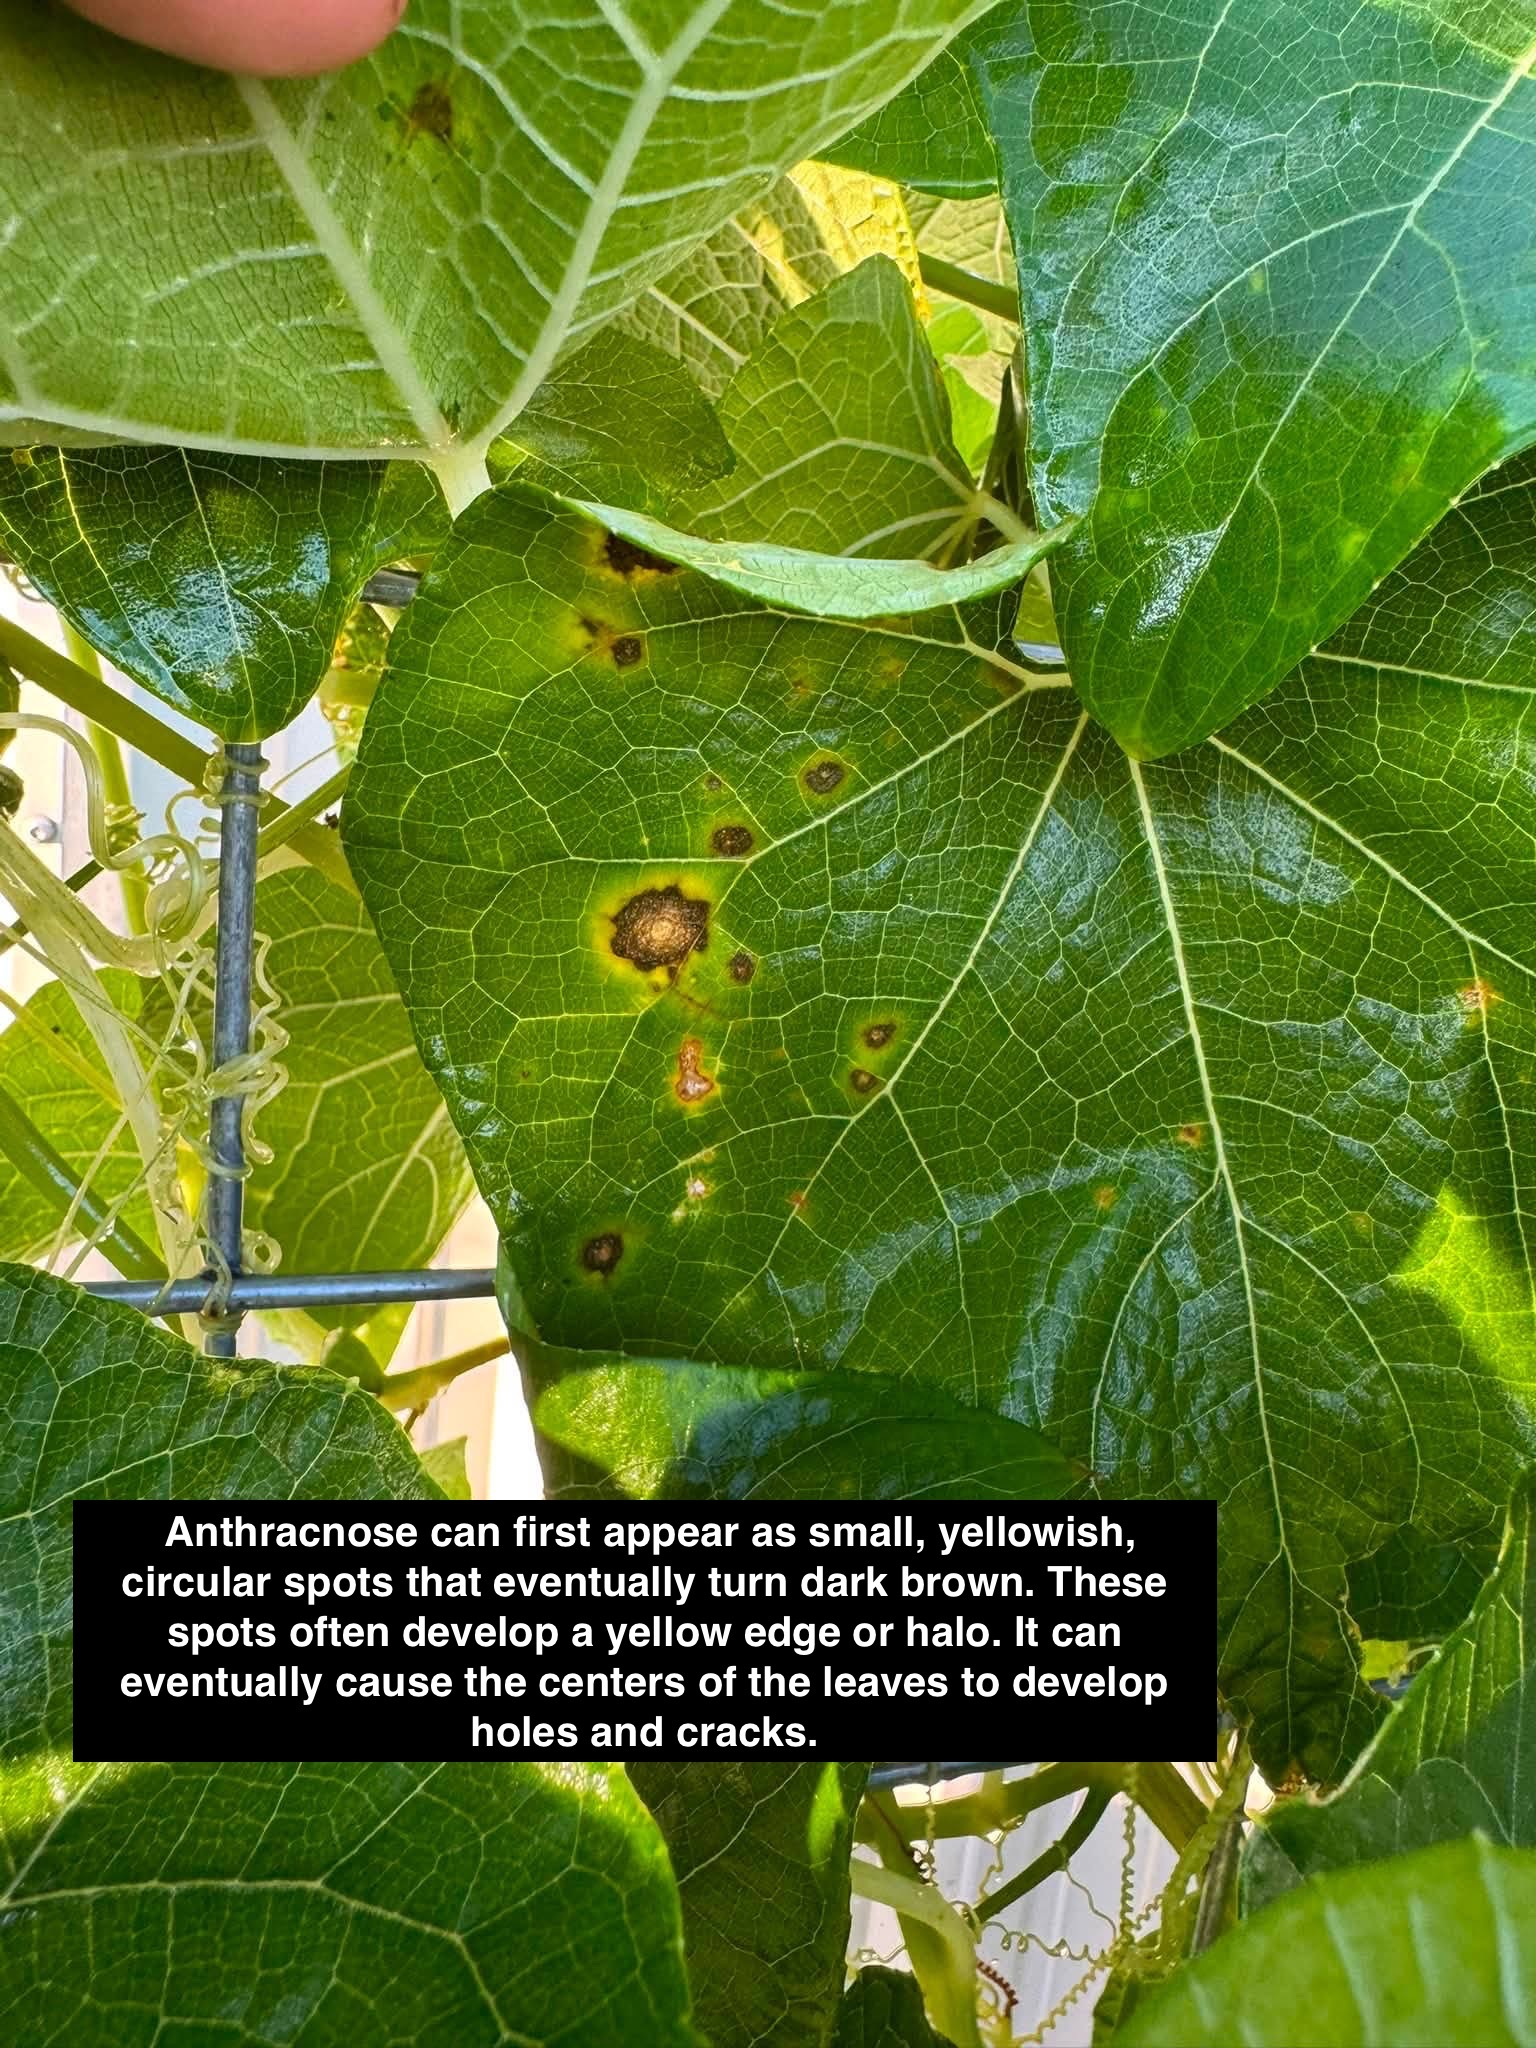
Anthacnose leaf spots.
Perfect example of anthracnose wedge-shaped sign on leaves–including the “rifle shot” hole. The fungus first feeds on living tissue, and then lives on dead tissue.
by Lance Hill | Jun 26, 2025 | How To, Mirliton
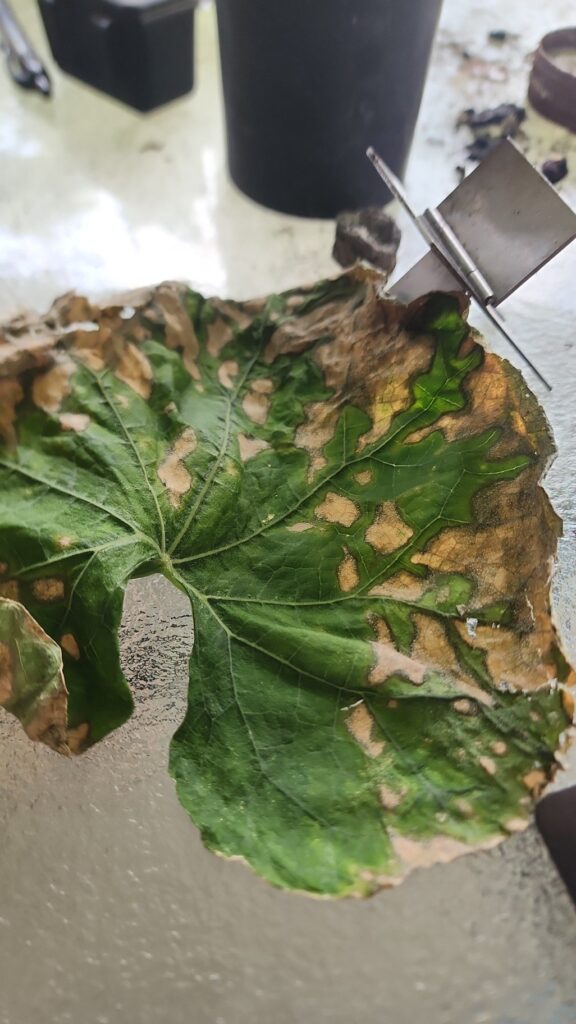
Alternaria Leaf Blight
Alternaria leaf blight in mirlitons, caused by the fungus Alternaria alternata, occasionally occurs in the U.S.A. The disease manifests as yellow, irregular spots that appear on leaves, often with a brown center. It’s often a secondary infection when the vine becomes stressed and weakened by excessive rains. It frequently affects new mirlitons in the early stages of growth.
Since it primarily affects leaves, it is not lethal and the vine will survive, but it can reduce the canopy.
It’s a waterborne fungus, so rain and overhead watering will spread it. Avoid overhead irrigation and remove and destroy infected plant material promptly to reduce the source of inoculum.

by Lance Hill | May 12, 2025 | How To, Mirliton

By Lance Hill and Kevin De Santiago
Many people want to grow their own mirliton (chayote) vine but find it difficult to find locally grown mirlitons. Because of their frustration, some people try to grow mirlitons by purchasing and planting one from the produce department in a grocery store. There are two reasons why this is not ideal.
First, all mirlitons sold in grocery stores and markets are imported varieties. They are grown and imported only as produce, just like all the other vegetables that you purchase. The USDA tried to grow these varieties a century ago and concluded that high-altitude plants have tremendous difficulty growing in low altitudes. This is because these varieties have adapted to the altitude, pests, diseases, and ultraviolet exposure in their native environment. The patterns of light and temperatures influence when and if the variety will flower and fruit. Moreover, an imported variety may not have acquired resistance to diseases or disease pressures that occur in its new environment.
All imported mirlitons will sprout and send up a shoot, but most imported mirlitons will not flower and set fruit. We have received reports of this problem from hundreds of growers over the years, and I had the same disappointing experience when I tried to use imported mirlitons to grow a vine.
Second, even if you could grow an imported mirliton, you may introduce new diseases that have devastated mirlitons elsewhere. Local mirliton varieties that are adapted to conditions in the U.S. have been grown for over two centuries in Louisiana and California. These were originally brought from low-altitude coastal areas in the Caribbean and Central America. In horticulture, these local varieties are called landraces— cultivars that growers have improved by traditional agricultural methods. The Louisiana heirloom mirliton is the U.S. mirliton landrace that has adapted to the regional climate, diseases, and pests through generations of trial and error. They are a reliable and healthy variety.
But they are vulnerable to new diseases from imported chayote sold as produce in grocery stores. Although no new mirliton diseases have been discovered in the U.S.A., it’s a widespread problem with other imported seeds, such as Tomato brown rugose fruit virus (ToBRFV) in tomatoes. The recently discovered Chayote Mosaic Virus (CMV) can be transmitted inside infected mirliton fruit without any sign of infection (seedborne and sapborne diseases). If you purchase infected imported mirlitons that carry the disease and then plant them, you may spread the disease to the Louisiana heirloom mirlitons. There is no cure for CMV, and you can potentially destroy all U.S. varieties. Read about CMV here.
In Brazil, scientists have recently discovered new fungi that cause anthracnose disease in mirlitons–also another soilborne and sapborne disease that can be spread through imported chayote. Read about it here.
To summarize: Imported mirlitons may not grow and fruit in the U.S., and if they do, they may have disastrous consequences for U.S. mirlitons landraces. It is best to wait until you find one of the Certified Louisiana Heirloom Mirlitons available on Mirliton.Org.
Recent Comments