How to Grow True-To-Type Mirliton (chayote) Varieties

How to Grow True-To-Type Mirliton (chayote) Varieties


You can grow two different varieties of mirliton in the same garden and still ensure that select seeds will produce the same plant as their parent variety.  In botany, we call this true-to-type seed—a seed that carries the expected, desired characteristics and qualities of the parent plants. It’s easy to do.

First, the basics of mirliton reproduction. A seed is created through fertilization. Fertilization requires pollination. Pollination is the transfer of pollen from the male part of the flower to the female part of the flower. Remember, pollination happens within the same species level, not between species. A mirliton and a pumpkin cannot cross-pollinate; only varieties of the mirliton species, Sechium edule can interbreed. Mirlitons are monoecious plants because they have both male (staminate flowers) and female (pistillate flowers). The pollen from the male flowers can fertilize the female flowers. This will produce fruit that ensures you will have identical offspring: true-to-type seed. 

The problem is that bees, the primary mirliton pollinator, travel several miles foraging flowers and they may introduce pollen from another nearby variety. Some think that if they plant a mirliton fruit, the vine that it makes will produce fruit identical to the planted seed. This is not necessarily true. The confusion arises because plants do not reproduce the same way that humans do. When two humans mate, the immediate offspring is comprised of half the genes of both parents. Mirlitons are different. The characteristics of the fruit on the vine are determined by the genes of the mother plant, regardless of how it was pollinated.

The color, shape, and skin surface of every fruit growing on the vine are created by the genetics of only the mother plant producing the fruit. The father’s genes from the pollen are embedded deep in the inner soft seed that you see when you cut open the mirliton. This inner soft-seed is called the embryo and it contains both the mother’s and father’s genes, but at this stage, the pollen–the father’s genes– don’t affect the fruit characteristics. 

The mother plant’s ovary controls the characteristics of the fruit enveloping the embryo, the fruit that we eat which includes the skin type and color. For example, assume that a smooth skin mother plant female flower is cross-pollinated by a spiny-skin male plant flower. The fruit that grows that year will still be a smooth skin fruit. The male pollen does not affect the first generation of fruit. But all the spiny genes are locked into the soft seed in the middle of the fruit, and if you pick that fruit and let it sprout and plant it, the fruit of that plant will have spines if spines is a dominant trait. 

So how do you ensure that fruit from your mirliton will be a copy of the mother plant? The answer is simple: use isolation to guarantee a true-to-type seed. If you protect a female flower from pollen from a distant mirliton, you can create a true-to-type seed. You only have to protect a few flowers because you only need the true-to-type seed of the mother variety to grow the next year or to give to another grower. It’s like my dentist used to tell me, “Only floss the teeth you want to keep.” 

How to Isolate flowers to Propagate True-To-Type Seed:

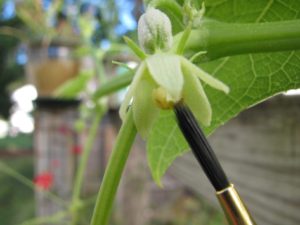
 The goal is to ensure that the female flowers on the vine receive only pollen from the male flowers on the same vine. Mirlitons normally first produce an abundance of male flowers in anticipation of the females. Male flowers are easy to recognize; they are little yellow flowers with no appendage (tiny fruit) between the flower and the stem (captioned photos are at the bottom of this article). They tend to grow clusters.  After the males appear, watch for female flowers to emerge; they will be far and few between but along the same vine as the males. The female flower petals do not initially open but they have a distinct bulge beneath the flower—a baby mirliton on the peduncle (stalk) between the flower and the vine. 

As soon as you identify a female flower and before it begins to open (see attached photos ), enclose it with a small transparent pollination bag to protect it from unwanted pollen. Tie the bag at its base. Then tie a piece of red yarn around the base of the flower to mark it as “control pollinated.” When the female flower is completely open, use an artist’s paintbrush to gather some pollen from the male flowers. You will see the yellow pollen on the brush. Take that pollen to the female flower and dab it onto the pistil and retie the bag. 

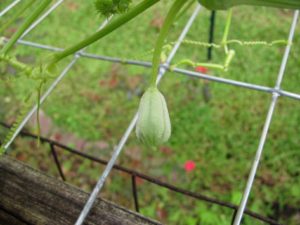
If the flower is successfully pollinated and fertilized, the petals will fall off the female flowers in three days, leaving the tiny mirliton fruit. You can remove the bag but leave the red yarn as a marker to indicate it is a true-to-type fruit. When mature and sprouted and planted, this seed will produce a plant that is true-to-type. 

Materials: Pollination bags: https://www.nativeseeds.org/products/sss006 

How to Propagate True-to-Type by Stem Cuttings Mirlitons:

True-to-type mirlitons can also be grown from stem cuttings (vegetative propagation) which will ensure that the plant is a copy of the mother plant. Growing from cuttings is the normal way mirlitons are propagated in Latin America since it (1) ensures uniformity in plant characteristics from generation to generation and (2) cuttings, unlike fruit, are free. Vegetative propagation requires more time and work than controlled pollination, but if you are interested, see the instructions for stem cuttings on the photo page here.

Read the research article on cuttings at: https://www.mirliton.org/wp-content/uploads/2019/11/Mirliton_Vine_Cuttings_Aricle.pd

(Special thanks to Dr. Joe Willis of the LSU AgCenter for his indispensable contributions to this article.) 

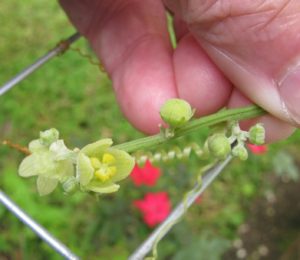
Male flowers first emerging and opening in clusters.
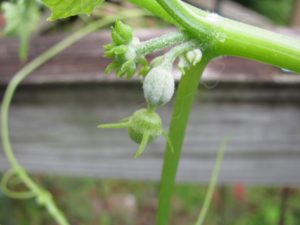
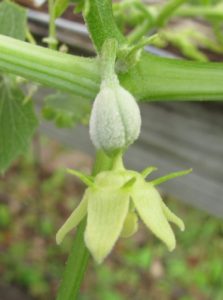
Unopened female.

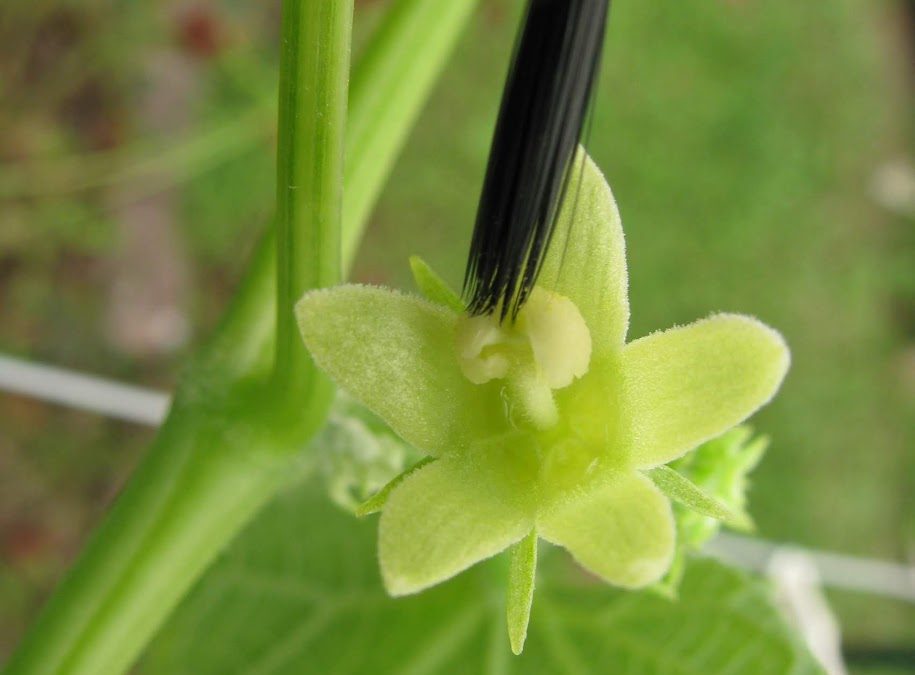
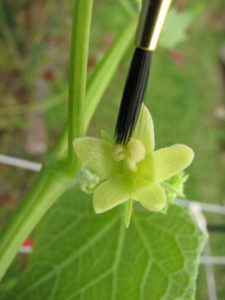
Female with opened flower.

Collecting pollen from male.

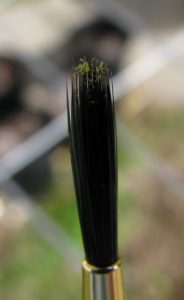
Brush with pollen on tip.

Dabbing pollen onto female.

Dropped petals on female indicate it was successfully pollinated.

A pollination bag is used to protect female flowers from cross-pollination.

Can My Mirliton (Chayote) Interbreed With Other Squash?

Many people have asked if there is a danger of interbreeding (cross-pollination ) if they grow mirlitons with other squash like Cucuzza and luffa. That’s understandable because the vines look and flower similarly.  The short answer is no, mirlitons and other squash species can’t cross-pollinate. 

Mirlitons can only pollinate other mirlitons, and other squash can’t pollinate mirlitons. 

But here’s an easy way to determine the danger of interbreeding with any combination of plants. 

We usually use common names for plants, but the key to knowing if they can interbreed is knowing the scientific name, called  “binomial name” which consists of the two words; genus and species. It is analogous to your personal name; your last name is your genus (family name) and your first name is specifically who you are in the family (specie). 

To determine the possibility of interbreeding, simply google the common name followed by the words “binomial name.” For example, if you google mirliton and “binomial name,” your first return is Sechium edule, which is the binomial name you are looking for.  Then google Cucuzza and “binomial name” and it will return Lagenaria siceraria. Now you know the genus and species of both.

Mirliton:
Genus: Sechium
Species: S. edule

Cucuzza:
Genus: Lagenaria
Species  L. siceraria

The two vines are in a different genus (genera is the plural), and different genera seldom interbreed

What if you have two plants in the same genus? Then look at the second name—the species. If they are the same species, they can generally cross-pollinate—that’s how botanists define species—any plants that are capable of interbreeding.  There are exceptions, but to be safe, don’t plant them together until you contact a plant expert who can advise you.

Now, practice the method on another plant: 

Find the scientific names (binomial names) for mirliton and cucumber. Compare them. Are they the same genus? If not, then it’s safe to plant them together.


Identifying and Contolling Powdery Mildew in Mirlitons

Powdery Mildew on a leaf in the early stages of the infection. The best time to diagnose powdery mildew is in the early stage on mostly green leaves. It starts as irregular pale yellow blotches that combine until the whole leaf is yellow.

Powdery mildew is a troublesome plant disease but, thankfully, never lethal.  It’s largely a Spring disease because it thrives in cool, damp weather, so it’s the first disease you will see in the mirliton growth cycle. The good news is that there’s an effective organic fungicide that manages the disease. 

The most visible signs of advanced powdery mildew are bright yellow leaves. But chlorotic (yellowing) leaves can be also caused by overwatering or anthracnose. The most accurate way to identify powdery mildew is to examine the seemingly healthy green leaves near yellowing ones.  Look for the early signs of mildew are irregular faded yellow blotches like in the photo above. That is the fungus forming little colonies that will eventually into bright yellow leaves.

If you find signs of the disease, there is a highly effective organic fungicide that can control it:  potassium bicarbonate. It can completely eradicate the disease in three weeks and works on downy mildew as well.

We recommend L.D. Carlson’s potassium bicarbonate because the manufacturer has verified with a Certificate of Authority (COA) that it is at least 99.5% pure. It’s generally sold in one-pound quantities, which is more than you will need, but it has a long shelf life, and you can share it with other growers. Click here to order online.

L.D. Carlson’s potassium bicarbonate.

If you are using a 99.5% pure potassium bicarbonate product, mix one tablespoon with a gallon of water and shake vigorously. Then spray only in the evening and thoroughly wet the tops and bottoms of all leaves. Apply once a week for three weeks until there are no signs of early infection (faded yellow blotches on green leaves).

For a more thorough article on powdery mildew and mirlitons, see my paper here.

Making Spring Mirlitons Sprout

Sprouting mirliton.

We occasionally get a Spring mirliton crop and decide to gift or sell them to others to grow. You could plant them in small containers and sell them that way, but that would mean that potential growers would have to transplant them into the ground during the full heat of the summer. That would be risky. That’s why we recommend that growers sell their fruit as sprouts as soon as possible after picking them.  Sprouts can be safely planted in May-June with a simple shade technique (click here). So how do you expedite sprouting?

Mirlitons sprout (germinate) in response to warm weather. Joseph Boudreaux taught me the simple technique for incubating mirlitons in May: Place them in a warm place outside and they’ll sprout within 10-14 days. It’s best to place them away from the direct sun and inside a container such as a milk crate where varmints can’t get them (squirrels, possums, and rats). As soon as they begin to sprout, you can assure people that they are viable seeds and ready to plant.

How to use a Bamboo Stake For Determining Plant Watering Needs

How to use a Bamboo Stake For Determining Plant Watering Needs

I realize that this sounds like a strange idea, but experienced container plant experts have been using wooden skewers and chopsticks to gauge soil moisture for years. The principle is simple; moist particles of soil adhere to the wood. A clean skewer means the soil is too dry, a muddy skewer means too much moisture, and a stake flecked with large soil particles means the moisture is fine. The same principles apply to using a large bamboo stake in your raised bed or garden.


The two methods gardeners often use are the second-knuckle method and the electric meter method. In the knuckle method, you insert your finger down to the second knuckle and feel if you feel moisture at the tip. That gives you a good reading of the soil moisture in the first two inches, but the mirliton root zone is much deeper than that. You need a reading of soil moisture from 1-6 inches, and a finger can’t do that.


The other popular method is a sleek moisture meter. Here the problems are several. The probe does not tell you what is happening at all levels. It rounds it off to one reading. Plus, the meter is set in the factory to a specific soil type. It has no idea about the unique qualities of your soil, such as porosity, particulate size, clay content, and amendments. That makes for unreliable readings. I think they are useful with house plants, but not with gardens.


The bamboo stake makes use of your own senses and can adjust to any soil conditions.  Look and feel are important gardening tools and they are used in high-tech soil labs. For example, when you submit a soil sample, the lab technician tests for the clay content by rubbing some of the soil between two fingers. Old school works.

You will primarily use the stake with young plants when rain is sparse and you are inclined to irrigate your plant.


Steps for Using the Bamboo Stake Soil Moisture Gauge:

  1. Use a standard ½-inch diameter bamboo tomato stake with no lacquers or plastic. Coverings can throw off the measurements. Make sure the stake is dry. I leave mine out all day.
  2. Select a place about 6 inches from the plant base. You can choose a different place each time if you are afraid of harming the roots.
  3. Shove the stake straight down about 4-6 inches and wait a couple of seconds, then pull it up quickly.

Read the stake:

  1. A relatively clean stake means soil moisture is low and you need to water. (photo 1)
  2. A slightly smeared or dirty stake, particularly in the first two inches, means the plant has more than enough available moisture and needs no water. (photo 2)
  3. An evenly distributed number of soil particles (crumbs) the length of the stake means the plant needs no water. (photo 3)

Wipe off the stake and set it aside to dry.

Learn from the stake:

 Make a mental note of what the stake looks like each time you test or take a photo. You will see that it gives you a graduated reading–each particle of soil represents the available moisture at that specific level. The bottom of the stake will show the moisture at the deepest level. You can learn from the tests: Do the test the day after you water or when it has rained so you see what good soil moisture looks like on the stake. 

If you want a more precise moisture reading that uses both appearance and feel of the soil, upgrade to the metal soil sampler.

FIg. 1. Clean bamboo stake means low soil moisture and you need to water the plant.

Fig. 2. A light coating of soil particles indicates good soil moisture. Note that the slightly muddy tip of the stake means the soil is getting saturated at the deepest level. No need to water.

Evenly distributed flecks (crumbs) of soil indicate good soil moisture at all root zone levels. No need to water.